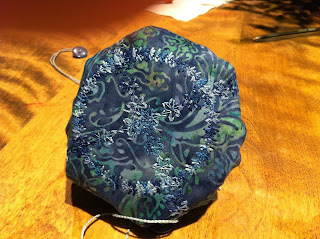
This jewelry bag has a place for everything. Rings are held by the loop (with velcro closure) in the middle. Bracelets fit in the centre circle. Earrings hook through the Aida cloth. Necklaces and etc. fit in the four pockets created by the Aida cloth circle.

It closes with pull strings anchored by buttons or beads. These longer strings allow the bag to open flat. Make them shorter and you'll still have excellent access.

Tiny, but more than up to the job.
Don't forget to admire the bottom. Decorative stitches used to anchor the Aida cloth layer show up again on the outer layer.
Materials
- 2 m thin cord
- 2 buttons or beads
- 2 pieces of thin fabric - minimum of 35 cm square
- 1 piece of Aida cloth - approx. 30 cm square
- .7 m double fold bias tape or foldover elastic
- small scrap of stiff interfacing
- ribbon or strap - 1/2" wide, 16 cm long
- 1/2" velcro
- circular attachment
Instructions:
Machine baste an X in the centre of the outer fabric. This will be useful for circular attachment placement.
Press the fabric in half through the X marking. Make an eyelet or small buttonhole (1 cm) on either side of this centreline. Carefully cut the buttonhole open. The outer edges of the holes should be 23 cm apart.
For all work with the circular attachment you may want to stabilize the fabric with a light, tear away stabilizer, such as Stitch and Ditch. Starch or Best Press may be an alternative. This will improve your accuracy and concentric lines of stitching.
Place the two fabric layers together, right sides together. Place tack through the basted X and sew a line of straight stitching at the largest setting - 26 cm. Remove fabric and trim closely to the stitch line. Press. Cut a small slit in the centre of the lining fabric and turn the circle right side out. Press carefully. Embellish the edge with a decorative stitch if you like.
Reattach the fabric circle to the circular attachment and sew two lines of straight stitching, on either side of the buttonholes. This will form the casing for the drawstring cording.
Find centre of Aida cloth and mark it with a basted X. Place centre on the circular attachment and sew one side of bias tape or foldover elastic to the cloth at the 20 cm setting. Be very careful not to stretch the edging as you apply it. An awl is useful to keep the edging aligned with the needle without stretching.
 Remove from attachment and trim closely. Press the edging out and over the edge. Return the Aida cloth to the attachment and stitch the edging down with a decorative stitch. Again an awl will be useful.
Fold 1 cm of each end under - one end to the right side and one end to the wrong side. Stitch small velcro circle to each end so the ribbon makes a loop. Stitch centre of loop to the centre of the Aid cloth circle. This will hold rings.
Cut heavy interfacing to a circle just shy of 8 cm. Baste to the back of the centre of Aida cloth circle. Centre Aida cloth circle in the middle of the lining. Recenter all layers on the circular attachment and stitch them together with a decorative stitch at the 8 cm setting. This marks the bag bottom and a place to put bracelets and watches.
Remove from the attachment and mark 4 quarter divisions on the Aida cloth, from the centre circle to the outer edge. Sew these lines through all layers with a decorative stitch. Do not stitch through the cord casing. This makes 4 pockets to hold necklaces. Earrings fit through the holes in the Aida cloth.
Thread cording through the casing and through a button or bead. Tie securely. Thread a second cord in the opposite direction, starting and ending in the opposite hole. You should make each cord long enough to lay flat in the casing but no longer.
Pull cords to draw the bag up into shape and enjoy!

No comments:
Post a Comment